Free Crochet Patterns: Ruffle & Sleek Velvet Scrunchies
Originally published on yarnbean.com in June 2021.

Y’all, the 80’s and 90’s are the style right now and I KNOW you know what that means – SCRUNCHIES ARE BACK! I LOVE it! I mean, the 90’s are kind of back in general, but we’re here to talk about scrunchies. Velvet scrunchies make for a great accessory – they look good in your hair or on your wrist!
What’s different about these scrunchies?
Other scrunchie patterns are made by crocheting into the hair elastic. This leads to uneven coverage of the yarn on the elastic and can cause them to pull or tear at your hair. The secret to these two scrunchies is that they are made with a traditional hair elastic, but the crochet piece is sewn around the elastic. This means 100% coverage over the elastic and a more even, polished-looking scrunchie!
These scrunchie patterns are great because:
They are easy and are great for beginners – this pattern uses foundational skills
Stash buster – this pattern is great for your stash of scrap velvet yarn
Quick and easy – these scrunchies can work up in as little as 20 minutes!
And, listen – I know that a lot of people are not fond of using velvet yarn. I was the same way for so long! Making so many scrunchies has really changed my opinion on velvet yarn, and now I’m honestly looking to incorporate velvet yarn into other patterns! I truly believe these scrunchies will change your mind on velvet yarn, too.
This blog post contains affiliate links, meaning if you purchase through these links, I earn a small commission (at no cost to you).
Are you learning to crochet and looking to find quality, affordable hooks? Early on in my crochet career I found these hooks from Clover, and I CANNOT crochet with any other hook! The grips are soft and easy to hold, and they are “short” enough that I can hold them comfortably. Check out a great starter hook set below from Amazon – seriously, you can’t beat this price!

Ruffle Velvet Scrunchie
Supplies Needed:
6.5 mm crochet hook
35 yards of velvet yarn – like Bernat Velvet – available at Yarnspirations)
Hair elastic – I exclusively use these Goody elastics that are available for a great price at Amazon
Scissors, tape measure, and yarn needle – I love this set of metal yarn needles from Amazon
Terminology and Abbreviations:
Chain(s) -ch(s)
Single crochet – SC
Fasten off – FO
Slip Stitch – sl st
Half double crochet – hdc
Ch 31
Starting with the second ch from the hook, sc into all stitches. Ch 1 and turn your work. (st=30)
Crochet two more rows of sc.
Wrap the velvet strip around a hair elastic length-wise (hot dog style) and sl st the two ends of the strip together, all the way around the hair elastic. This will enclose the hair elastic completely. You will want your slip stitches to be loose enough to crochet back into them in a future step. At the end of the row, sl st into the first stitch.
Ch two. Into the same sl stitch, put 3 hdc into the sl st. Put 3 hdc into each sl st around the scrunchie. At the end, sl st into the first hdc. (st=90)
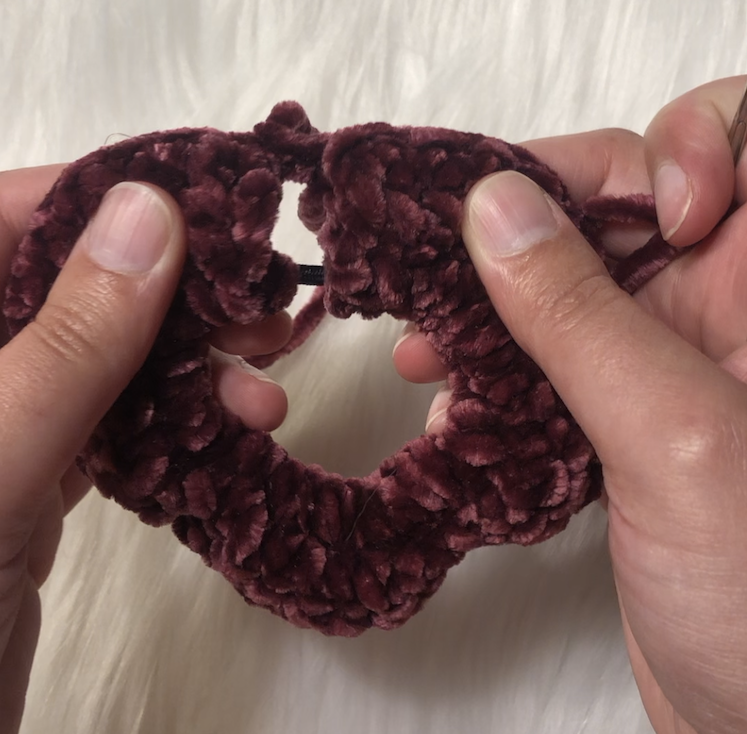
FO and leave a 10 inch tail. You’ll notice that there is a gap between the beginning and end of the scrunchie – we’re going to fix this! Slip your tail through a yarn needle and sew the two ends of the scrunchie together so that there is no longer a gap.

7. Once you’ve sewn together the gap, make a knot and weave in your ends. With these scrunchies, I like to feed the ends of yarn through the empty cavity of the scrunchie.
Sleek Velvet Scrunchie
Supplies Needed:
6.5 mm crochet hook
35 yards of velvet yarn – like Bernat Velvet – available at Yarnspirations)
Hair elastic – I exclusively use these Goody elastics that are available for a great price at Amazon
Scissors, tape measure, and yarn needle – I love this set of metal yarn needles from Amazon
Terminology and Abbreviations:
Chain(s) -ch(s)
Single crochet – SC
Fasten off – FO
Slip Stitch – sl st
Ch 36
Starting with the second ch from the hook, sc into all stitches. Ch 1 and turn your work. (st=35)
Sc for 5 more rows
Wrap the velvet strip around a hair elastic length-wise (hot dog style) and sl st the two ends of the strip together, all the way around the hair elastic. This will enclose the hair elastic completely. At the end of the row, sl st into the first stitch.
FO and leave a 10 inch tail. You’ll notice that there is a gap between the beginning and end of the scrunchie – we’re going to fix this! Slip your tail through a yarn needle and sew the two ends of the scrunchie together so that there is no longer a gap.
6. Once you’ve sewn together the gap, make a knot and weave in your ends. With these scrunchies, I like to feed the ends of yarn through the empty cavity of the scrunchie.
You do not have permission to sell, share, copy, or duplicate this pattern or my photos in any way. Do not use this pattern for a video, blog, or class tutorial. You may sell finished products made from this pattern, but please credit Yarn Bean as the pattern writer under all circumstances. I love seeing what others make from my patterns, so please feel free to tag me on social media! Thank you for following these rules.
Make sure to save this pattern to Pinterest to save it for later!